Local Constraint Market Overview
The Local Constraint Market (LCM) is available to Flexibility Service Providers (FSPs) on Piclo to provide flexibility to help manage local constraints in Scotland (B4 and B6 boundaries). FSPs have the opportunity to participate in Day-ahead and Intra-day competitions as and when constraints need to be addressed.
If you are interested in participating in the LCM, the information below provides you with an overview of the steps involved.
Registration
To create an account, go to picloflex.com and select the ‘register’ button in the top navigation bar and complete the forms.
As part of this process, you can create a user login (email, password etc.) and a Flexibility Service Provider (FSP) organisation account by providing registered company information. If there are multiple companies, please use the parent company information provided on the form.
You will need to accept the user terms for yourself, and the service terms on behalf of the company.
IMPORTANT: The company email address that you provide at registration will be the email address that receives the dispatch instructions so please make sure that any inbound emails are forwarded to the correct team by setting rules via your email host. Dispatch instructions need to be accepted within 60 minutes of receipt. Please ensure that this email address is monitored
Company Qualification
Once you've registered on Piclo, the next step is to complete the company qualification. NESO requires all LCM participants to apply and submit a company qualification application. You can either find the 'LCM Qualification' competition on the map and click 'Apply' or follow the steps below:
- Navigate to Manage > Applications > NESO Local Constraint Market
- Click apply (top right) and complete the company qualification application. If you wish to finish completing the application at a later stage, please select 'save' and 'continue' at the bottom of each section. This will save any information provided so that you can come back to it at a later stage.
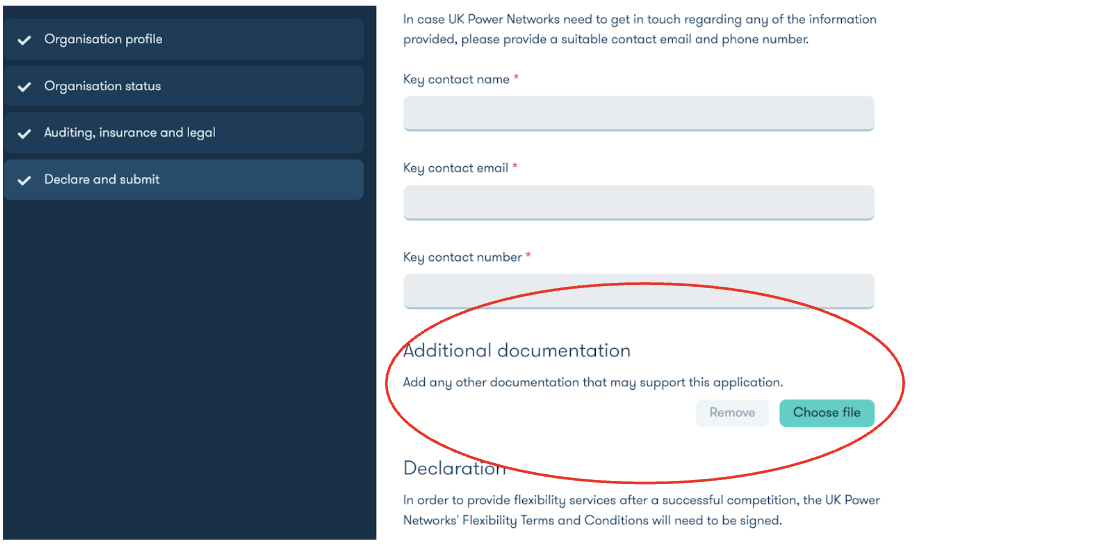
- The NESO Framework Agreement will need to be reviewed and signed before being submitted as part of the company qualification application. In addition to this document, you will also need to complete a Due Diligence Questionnaire. If the required documents are not provided, the application will be rejected. The required documents need to be uploaded in the final section of the application under 'Additional Documents' (See screenshot below).
- Shortly after submission of the company qualification application, you will receive an email notifying you of the outcome of the application.
- If the company qualification is approved, NESO will countersign the Framework Agreement and return it via email.
- If the company qualification is rejected, there will be an opportunity to review and re-submit the application.
Asset Qualification
You can upload or change asset information at any time prior to bidding into intra-day and Day-ahead competitions.
To upload new assets and or edit existing assets;
- Navigate to Manage > Assets and 'download the latest template' to add new assets or 'download existing assets' to change or remove existing assets in the platform. FSPs must ensure that their assets are compliant with the requirements outlined in section 1.2 of the Service Terms.
- Fill in all the required data points (one row per asset) and/or edit any assets that require editing, and save the file as xlsx. MPANs must be provided for all assets participating in LCM.
- If your company qualification is approved and assets are within the correct location, at the correct voltage and have the compatible capacity, the assets will be qualified to bid.
NB: If you want to bid with multiple assets in a single bid, we recommend you include the GSP in the asset reference e.g. AYRR-Battery1. Adding the GSP at the beginning of the reference allows you to easily group your assets by GSP at the bidding stage. Any bids across multiple GSPs will be rejected by NESO
Bidding
- NESO will run Day-ahead competitions for delivery from 07:00 the day after bidding has concluded (Day+1) to 06:59 the following day (Day +2). Bidding for Day-ahead competitions will be between 13:00 - 18:00 UK time. There will be 48 service windows for each 30-minute settlement period.
- NESO will run Intra-day competitions for delivery between 19:00 the day of bidding (Day. 0) and 06:59 the day after bidding (Day +1). Bidding for intra-day competitions will be between 05:00 - 10:00 UK time. There will be 24 service windows, one for each 30-minute settlement period.
- FSPs can participate in intraday and day-ahead auctions on the same day with the same asset, provided the capacities are equal and do not conflict with obligations from multiple markets. For instance, with a 1 MW asset contracted for 0.5 MW in the day-ahead market during settlement period 21, you can bid up to 0.5 MW for the same period in the intraday market. Alternatively, if contracted for 0.5 MW in settlement period 21, you can bid up to 1 MW in settlement period 22 from the same asset in the intraday market.
- To submit bids, navigate to Manage > Bids > Submit new bids and select the competition to bid into.
- For LCM, assets should only be bid together in aggregate if located in the same GSP. To bid with specific assets click 'view or edit included assets'. Select the asset(s) you wish to bid with and scroll to the bottom and click confirm. Assets can be re-named to include the GSP in the asset reference to make it easier to group correct assets together. Bids across GSPs will be rejected.
- Enter bids for all settlement periods the assets are available for and click submit bids. To enter bids with another asset(s), click ‘add another bid’ and repeat the process until you have submitted bids for all assets you wish to bid with.
- If you'd like to bid into all service windows with sets of assets. click 'apply to all service windows'.
- Once finished, click 'Finish bidding'
- Bulk bid submission does not support advanced bidding features. If you want to use split bid or asset-specific bidding, please go to Submit new bids.
- FSPs are required to upload baseline data immediately after bidding. See “Reporting Baseline Data”.
Dispatch Instructions
- Dispatch instructions will be sent via email immediately after NESO has confirmed bid decisions. A dispatch instruction per bid will be sent. FSPs will have 1 hour to respond to dispatch instructions. You will need to accept or reject each one.
- On Piclo, navigate to Operations > Dispatch Schedule. Dispatch instructions awaiting a response are listed at the top of the page. For each dispatch instruction, Accept or Decline the dispatch instruction.
- Dispatch instructions that have been accepted or declined appear at the bottom of the page in chronological order.
- Each dispatch shows a GSP. This can be used to identify which assets are associated with a dispatch.
- If there are multiple bids with different assets for the same GSP, you can use the Obligation ID to identify the specific assets. Navigate to Manage > Contracts and download the contractual obligations. Locate the Dispatch ID to find the Piclo Contract ID and associated Asset IDs in the obligated assets tab.
Reporting Unavailability
- If an accepted dispatch can no longer be delivered as scheduled, unavailability must be reported via Piclo.
- Navigate to Manage > Contracts and click 'Report unavailability'. Enter the time and date between which you are unavailable and select a reason from the drop-down. All obligations you have between those dates and times will be listed.
- Select the obligation that you can no longer dispatch against and submit. Note: There will not be an update to the dispatch instruction list to reflect unavailability but NESO will be notified.
Reporting Baseline Data
- A nominated baseline is used for LCM. Please upload a nominated baseline for all assets for which you have submitted bids immediately after bidding.
- Navigate to Settlement > Upload settlement data and download the latest template. Open the file and go to the Half Hourly Forecast tab to upload the baseline meter data.
- Row by row, enter the meter ID(s) for all obligated assets (Required: including import and export meter IDs if the asset has both). Make sure to choose a direction option that corresponds to the Meter ID and row of energy values being entered:
- Export: the energy values of this row represent energy exported to the network.
- Import: the energy values of this row represent energy imported from the network.
- Enter the normal expected delivery (nominated baseline) in kWh for each half-hourly period (HH) beginning at HH01, Column F (00:00-00:30). Note: There are 50 half-hourly periods to account for daylight savings, please only fill out 48 unless it is the day of a clock change.
- Please enter your baseline meter readings 12 hours before and after the delivery periods, bid into.
- Go to Upload settlement data and upload the completed template
Reporting Settlement Data
- Once the final dispatch event has occurred, FSPs have 5 working days to upload the actual meter readings.
- Navigate to Settlement > Settlement Data Required>Click Fill in template to upload and download a summary of all meter data required.
- To upload actual dispatch meter data, go to the Half-Hourly tab of the settlements template. The previously entered obligated meter IDs will be pre-populated in the Half-Hourly tab.
- Please enter your actual meter readings 12 hours before and after the delivery periods, bid into.
- Enter the meter data in kWh for each of the half-hour periods (Columns) the asset(s) were obligated to dispatch for on that date. Make sure to choose a direction option that corresponds to the Meter ID and row of energy values being entered:
- Export: the energy values of this row represent energy exported to the network.
- Import: the energy values of this row represent energy imported from the network.
- Repeat for all Meter ID’s and dates shown.
- Go to Upload settlement data and upload the completed template.
Note: Navigate to the Settlement data required page>click View by dispatch tab. The baseline and dispatch columns should subsequently show as Complete if baseline data was uploaded after bidding.
Monthly Settlement Report
- On the 11th working day of the month, navigate to Settlement > Settlement Reports. Download the settlement report for the month that has just completed.
- If you disagree with the results, you have 5 working days to contact support@piclo.energy and dispute the results.
- If no disputes have been received from you or NESO, the report will be finalised on the 16th working day of the month.